
Imagine you operate a hospital. You might already have a system where doctors log in to access patient details. If you choose NeetoCal to manage doctor availability, doctors may also need to log in to the Neeto authentication system. Now, if your hospital app already has an authentication system, this could feel redundant - requiring separate logins for both systems. The Single Sign-on (SSO) feature can solve this by allowing doctors to log in once to the hospital app and then access Neeto products with a single click, eliminating the need for separate logins.

Team member login vs Customer login
Before proceeding, it's crucial to understand the difference between the two login types.
A Team member is a member of the workspace - someone who belongs to the Neeto product and operates it internally. For example, in NeetoDesk, customers create tickets and agents resolve them. If you want an agent to sign in to NeetoDesk, use Team member login, because that agent is already a part of your Neeto workspace.
A Customer is someone outside your workspace who interacts with it. Use a Customer login for these external users. For example, if you want customers to open or read only the tickets they raised in your NeetoDesk workspace, use a Customer login: they are not workspace members, but they still need to see their own tickets.
How to set up SSO
-
Generating your key
Go to the Admin panel for your workspace and click SSO settings.
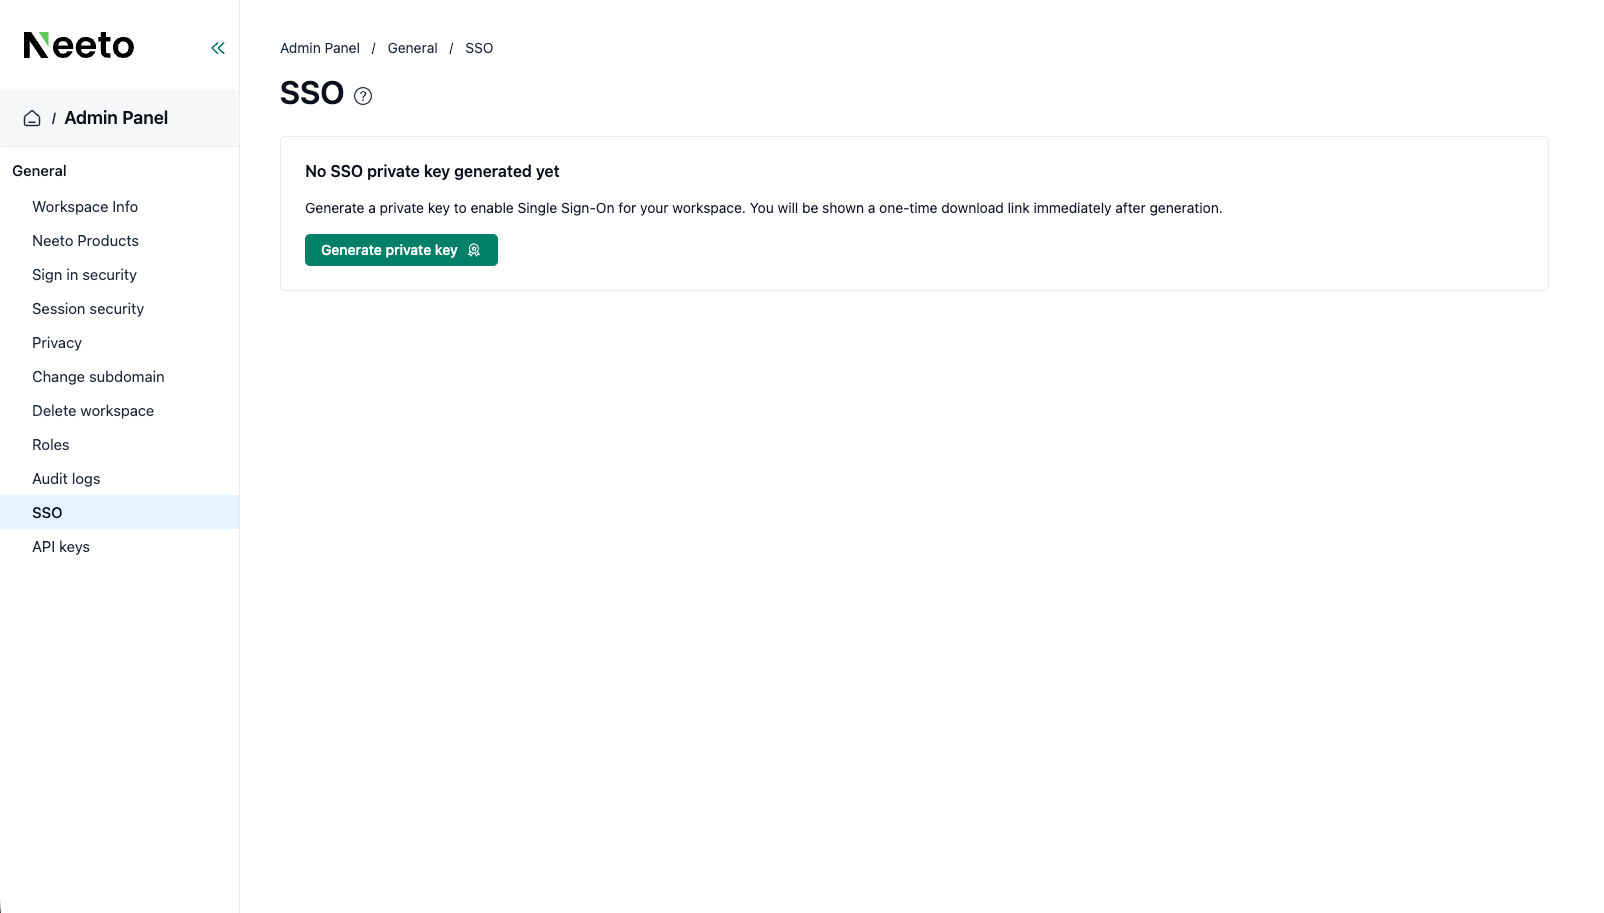
Neeto workspace settings | SSO key generation
Eg: If your workspace subdomain isacme,then visithttps://acme.neetoauth.com/admin/admin-panel/general/sso -
Click on the Generate private key button on the page to generate a one-time link that will download the private key.
-
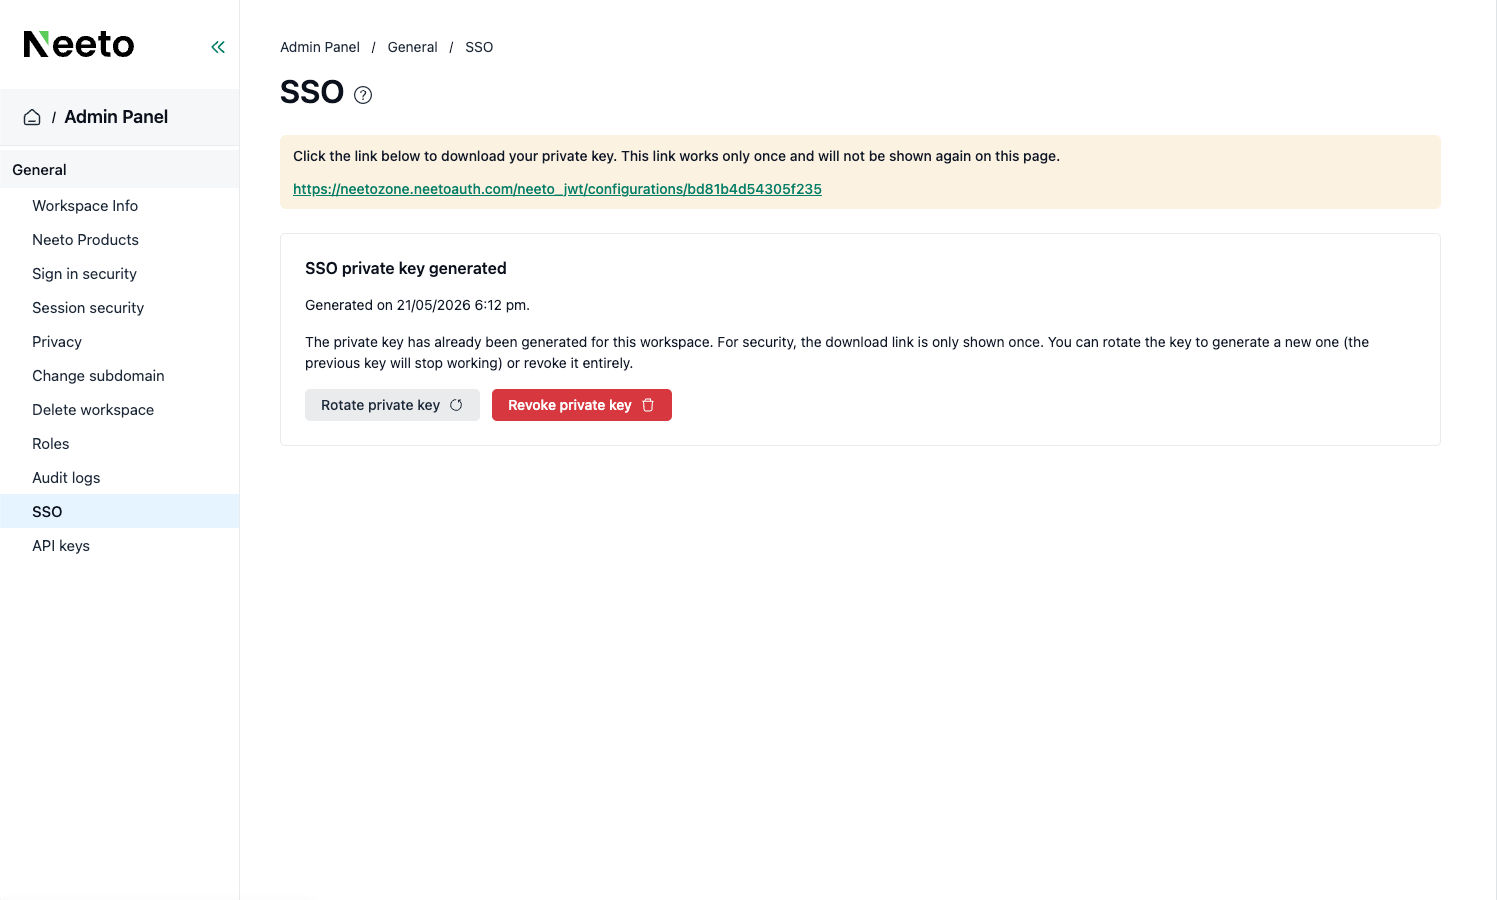
Download and store the file securely.
Clicking the link downloads a file containing your key - save it somewhere safe immediately, as the link works only once.
-
Protect the private key.
The downloaded file contains the private key that powers your SSO. Treat it as a sensitive secret: anyone who obtains it can gain access to your workspace, so NEVER share it with anyone you don't fully trust.
If you suspect the key has been compromised, click the Rotate private key button to revoke the existing private key and generate a new private key. You can also use the Revoke private key button to only revoke the existing private key without generating a new one. Please note that the existing key will stop working as soon as you revoke or rotate a private key, and your existing SSO setup will stop working until you update it with the new private key. -
Choose your login type and start building.
First, decide which type of login you need:
Team member login - for members of your team who work inside the product.
Customer login - for your customers, who interact with the product from the outside.
Both - if your product needs each type for different people.
Once you've decided, you can use our example projects as a starting point. They're written in JavaScript and show exactly how the login is set up end-to-end:
Team member login example: https://github.com/neetozone/neeto-jwt-demo-js/pull/1
Customer login example: https://github.com/neetozone/neeto-jwt-demo-js/pull/2
Using a different language or framework? No problem. You can build your own version using our source code as a guide: https://github.com/neetozone/neeto-jwt/tree/main/js/src
Tip:
If you use an AI assistant (like ChatGPT or Claude), share the example pull requests and source code above with it - it can help translate the setup into your language or framework.Once you set up the SSO using the instructions above, the SSO setup should be complete, and users should be able to sign in to your Neeto workspace seamlessly from your product, without going through the Neeto authentication system.
Still having trouble?
Check out the FAQ first, as it covers most setup issues. If you still need help, contact our customer support team, and we'll assist you.
Frequently Asked Questions
Configuring SSO involves several components, and most problems stem from minor misconfigurations. Here are the most frequent issues users might encounter and their solutions.
1. Login isn't working at all - I get an error right away.
The most common cause is a missing or mistyped configuration value (what developers call an "environment variable"). Your code needs to know two things to work:
Your workspace name - which Neeto workspace the login is for.
Your private key - the secret key you downloaded.
What to check:
Open the configuration file (usually called
.env) in your project and confirm both values are filled in.Make sure there are no extra spaces, line breaks, or quotation marks around the values.
If you're running the app on a server (not your laptop), confirm those same values are set on the server too - values on your laptop don't automatically copy over.
2. Login works for my team, but not for my customers (or vice versa)
This usually means the login type (called the "scope") is set incorrectly. Remember:
Team member login is for the people inside your workspace.
Customer login is for the people outside your workspace.
If you built a Customer login but left the scope set to "team member" — or the other way around — the login will fail because Neeto is looking for the wrong kind of account.
What to check: Open the code where you create the login token and confirm the scope matches the type of person logging in.
3. Login starts, but I land on a broken or wrong page at the end
After someone signs in, Neeto sends them back to a page on your website. That destination is called the redirect URL (or "redirect URI"). If it's wrong, the user gets redirected to a page that doesn't exist or isn't configured to receive them.
A few important things to know:
Team member login and customer login each need their own redirect URL. They cannot share one. If you copy and paste the same URL into both, one of them will break.
The URL has to match exactly - including
https://vshttp://, trailing slashes, and capitalization.
What to check: Compare the redirect URL in your code to the one provided by Neeto. They should be identical, character for character.
4. It worked yesterday, but suddenly stopped
A few common causes:
Your private key was rotated. If you (or a teammate) requested a new key, the old one stops working immediately. Make sure your code is using the latest key.
The configuration values got cleared. Some hosting platforms reset environment variables during deploys - confirm they're still set.
Your server's clock is wrong. Login tokens are time-sensitive. If your server's clock drifts more than a few minutes from real time, tokens will be rejected. Most hosts fix this automatically, but it's worth checking if nothing else explains the issue.
5. I accidentally committed the private key to GitHub / shared it in Slack
Treat the key as compromised, even if you deleted the message right after. Anyone who saw it (including automated scanners) can use it to access your workspace.
What to do:
Go to the SSO settings of your Neeto workspace. If your workspace subdomain is
acme, then visithttps://acme.neetoauth.com/admin/admin-panel/general/ssoClick the Rotate private key button to revoke the existing private key and generate a new private key. You can also use the Revoke private key button to only revoke the existing private key without generating a new one.
This will ensure that your compromised key is revoked and may no longer be used to bypass the login.
6. Am I supposed to put the private key directly in my code?
NO - NEVER. The private key should always live in an environment variable (a setting stored outside your code), not pasted into a code file. Code files are often committed to GitHub or shared with teammates; environment variables aren't.
If you're not sure how to set environment variables on your hosting platform, search "[your platform name] environment variables" — for example, "Vercel environment variables" or "Heroku environment variables". Every modern host supports them.
Technical Notes - How NeetoJWT works under the hood
This section explains how the SSO works under the hood using JWT and serves only as informational. The information here is not necessary to implement SSO yourself. The details provided here are technically advanced. So feel free to skip this section if you're just here to implement Single Sign-on for your application.
Neeto's SSO uses a signed JWT as the authentication token: your product signs a short-lived JWT with your private key, and Neeto verifies it with the matching public key to log the user in.
What is a JWT?
A JWT (JSON Web Token) is a compact, URL-safe string that represents a signed claim about a user. It has three parts separated by dots:
<header>.<payload>.<signature>Header: describes the signing algorithm (
ES256for NeetoJWT).Payload: the claims about the user (email, workspace, scope, issued-at, expiry).
Signature: proves the payload was signed by the holder of your private key and has not been tampered with.
NeetoJWT signs tokens with ES256. This is an asymmetric algorithm: you hold the private key and use it to sign tokens; NeetoAuth holds the matching public key and uses it to verify them. The keypair uses the P-256 elliptic curve and is distributed in PEM format.
JWT payload
Every NeetoJWT token contains the same payload, regardless of language:
Claim |
Value |
|---|---|
|
The user's email address. |
|
Your Neeto workspace (e.g. |
|
|
|
Current time, in seconds since the epoch. |
|
|
End-to-end flow
The neeto-jwt library handles the partner side of the flow: minting the JWT and constructing the redirect URL. Everything from the moment NeetoAuth receives the redirect onward is handled by Neeto.
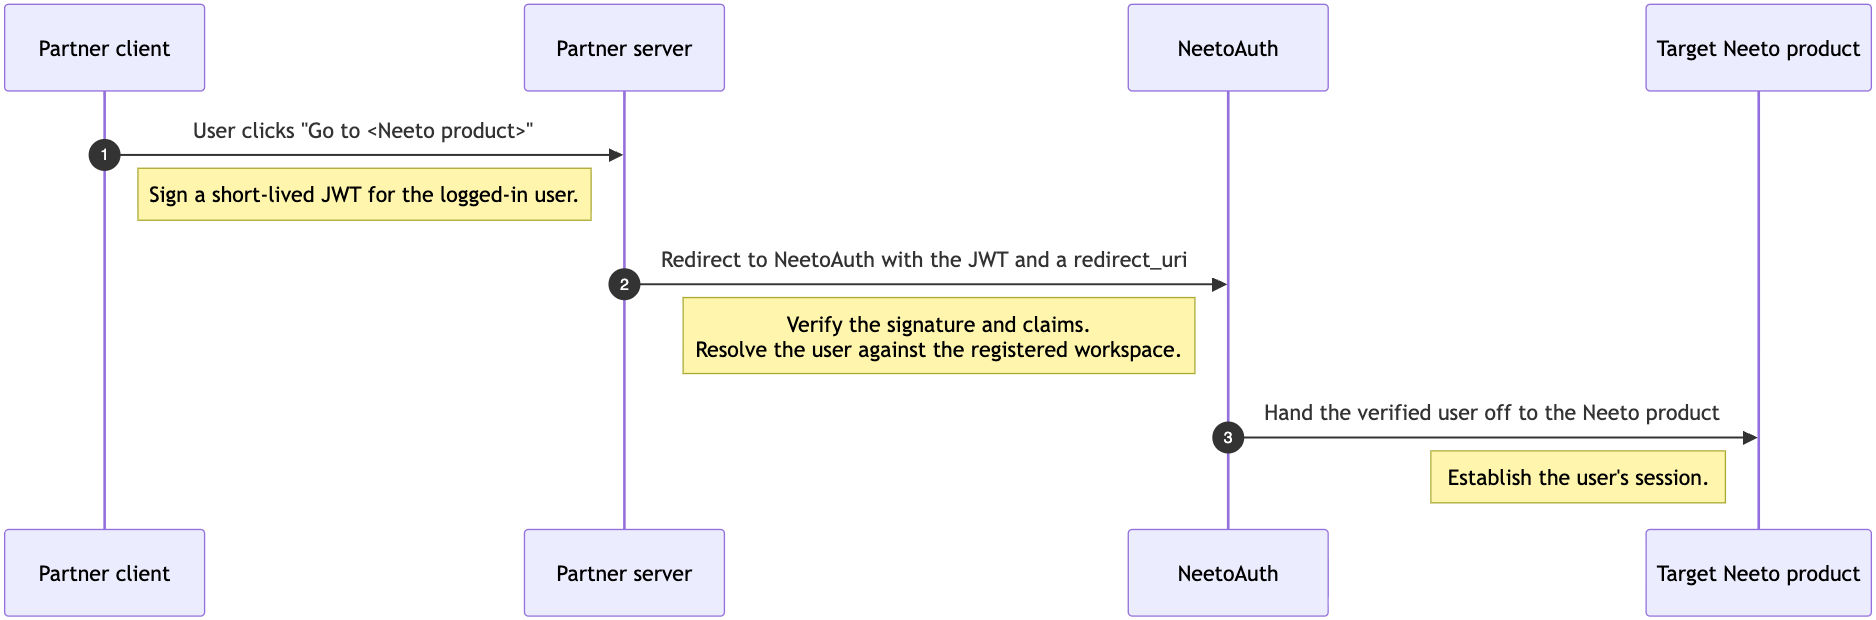
Step 1: User triggers the login
[partner client] → [partner server]The user clicks a UI element such as a "Go to NeetoCal" button on the partner's product. The browser issues a regular HTTP request to the partner's backend.
At this point, the user is already authenticated in the partner's own auth system - they have a partner session cookie. The SSO flow exists to propagate that existing identity to Neeto, not to re-authenticate.
Step 2: Partner server signs a JWT
[partner server]: neetoJWT.generateJWT()The partner's server uses the neeto-jwt library to sign a short-lived JWT carrying the user's identity claims: email, workspace, scope, iat, and exp. The token is signed with ES256 and is valid for 2 minutes.
The key pair used for signing is issued by Neeto when the partner is onboarded. The partner keeps the private key on their server and uses it to sign every JWT. Neeto holds the corresponding public key in the partner's workspace and uses it only to verify. The private key must remain on the partner's server - it should never be embedded in client code or shared with third parties.
Step 3: Partner server redirects the browser to NeetoAuth
[partner server]: neetoJWT.generateLoginUrl(redirectUri)
[partner server] → [NeetoAuth]
The library constructs a NeetoAuth login URL that includes the JWT, the post-login redirect_uri, and a client hint identifying which Neeto product the user is heading to.
The server responds with an HTTP 302 to this URL; the browser follows it. The JWT travels as a query-string parameter - this is forced by the redirect-based flow, where no application-controlled HTTP client could attach an Authorization header. The 2-minute TTL is what makes this transport acceptable.
Step 4: NeetoAuth verifies the JWT
[NeetoAuth]: verify signature and claimsNeetoAuth verifies the JWT's signature against the public key it holds for the partner's workspace, and confirms each claim is valid:
The token is within its short validity window.
The workspace claim resolves to a workspace registered for JWT login.
The scope is consistent with the endpoint being called (team member vs customer).
The token has not been seen before — replayed tokens are rejected.
For the team member scope, the asserted email is already a member of the workspace.
For the customer scope, the customer is looked up by email or auto-created on first sight, mirroring the existing self-serve customer sign-up flows.
If any check fails, NeetoAuth rejects the request - the user is redirected to a login page, never to the partner's redirect_uri.
Step 5: NeetoAuth establishes the user's session
[NeetoAuth] → [target Neeto product]Once verification passes, NeetoAuth signs the team member (or customer) in on its own side. First-time customers are routed through a one-time profile-completion screen (name + country + time zone) before continuing; returning customers and workspace team members skip straight through.
Step 6: Target Neeto product establishes its own session
[Neeto product] → establish sessionThe target Neeto product detects the active NeetoAuth session and completes its own login through Neeto's standard SSO handshake. This sets the product-side session cookie.
Step 7: User logs in
The browser lands at the redirect_uri, already authenticated against the target Neeto product. Every subsequent request from the browser carries the session, so the user remains logged in for the duration of the session.
Where each component lives in the codebase
Component |
File |
Role |
|---|---|---|
|
Constructs and signs the JWT; builds the login URL |
|
|
Signing step (ES256, 2-min TTL) |
|
|
Wraps the JWT into the redirect URL |
|
|
Selects host + path based on scope |
|
|
Derives |
|
|
Routing tables |